Powershell, Microsoft Graph - Multi Tenant Entra ID Application for Multi Tenant Automations
Fun fact for my PowerShell and automation fans out there. Did you know that by using the Microsoft Graph PowerShell module and a Multi-Tenant enterprise application, you can run automations across multiple tenants easily?
Often, we want to run automations across multiple tenants without having to authenticate each time. Back in the day, we used the partner portal to do this easily. However, with the retirement of DAP (Delegated Admin Privileges) and the move to GDAP (Granular Delegated Admin Privileges), the process has become a bit trickier.
What is outlined here is essentially the new process (It is also how third-party applications access customer tenants).
Using the partner center CPV API, it is possible to remove the need to manually consent in each child tenant. However, I will not cover this in this post. Perhaps in the future, I will outline it if there’s interest.
For this process to work, we’ll follow a three-step approach:
1) Register a Multi-Tenant Enterprise Application and set the desired API permissions.
2) Consent Using the URL: For any desired partner tenants, navigate to the consent URL and grant permission to the application.
3) Connect with Microsoft Graph PowerShell Module: Use the Microsoft Graph PowerShell module to connect to the partner tenant via our created enterprise application.
Step 1: Register a Multi Tenant Enterprise Application
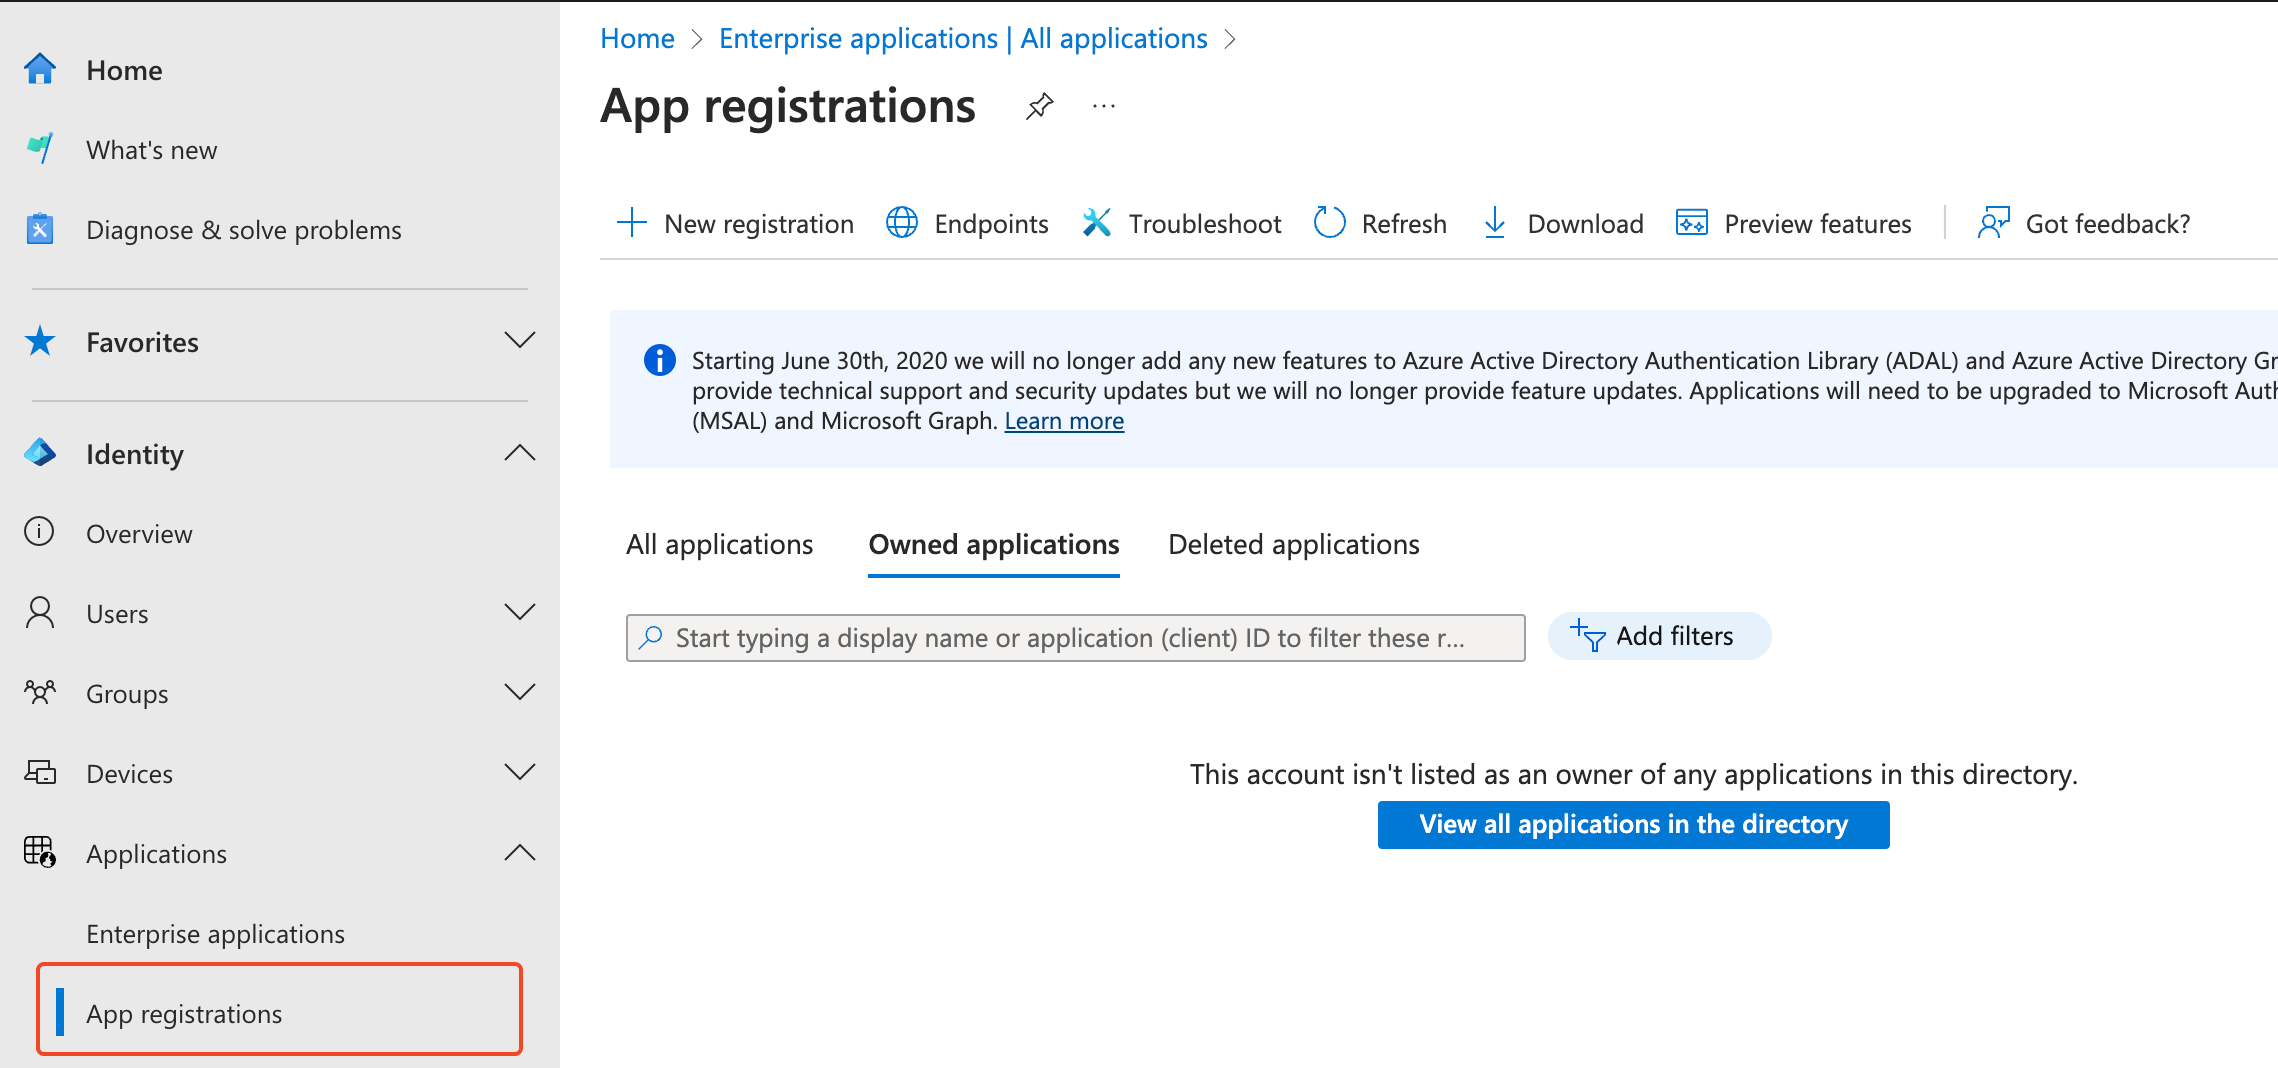
Our fist step is to register a enterprise application. Login to Entra AD and navigate to application registrations.
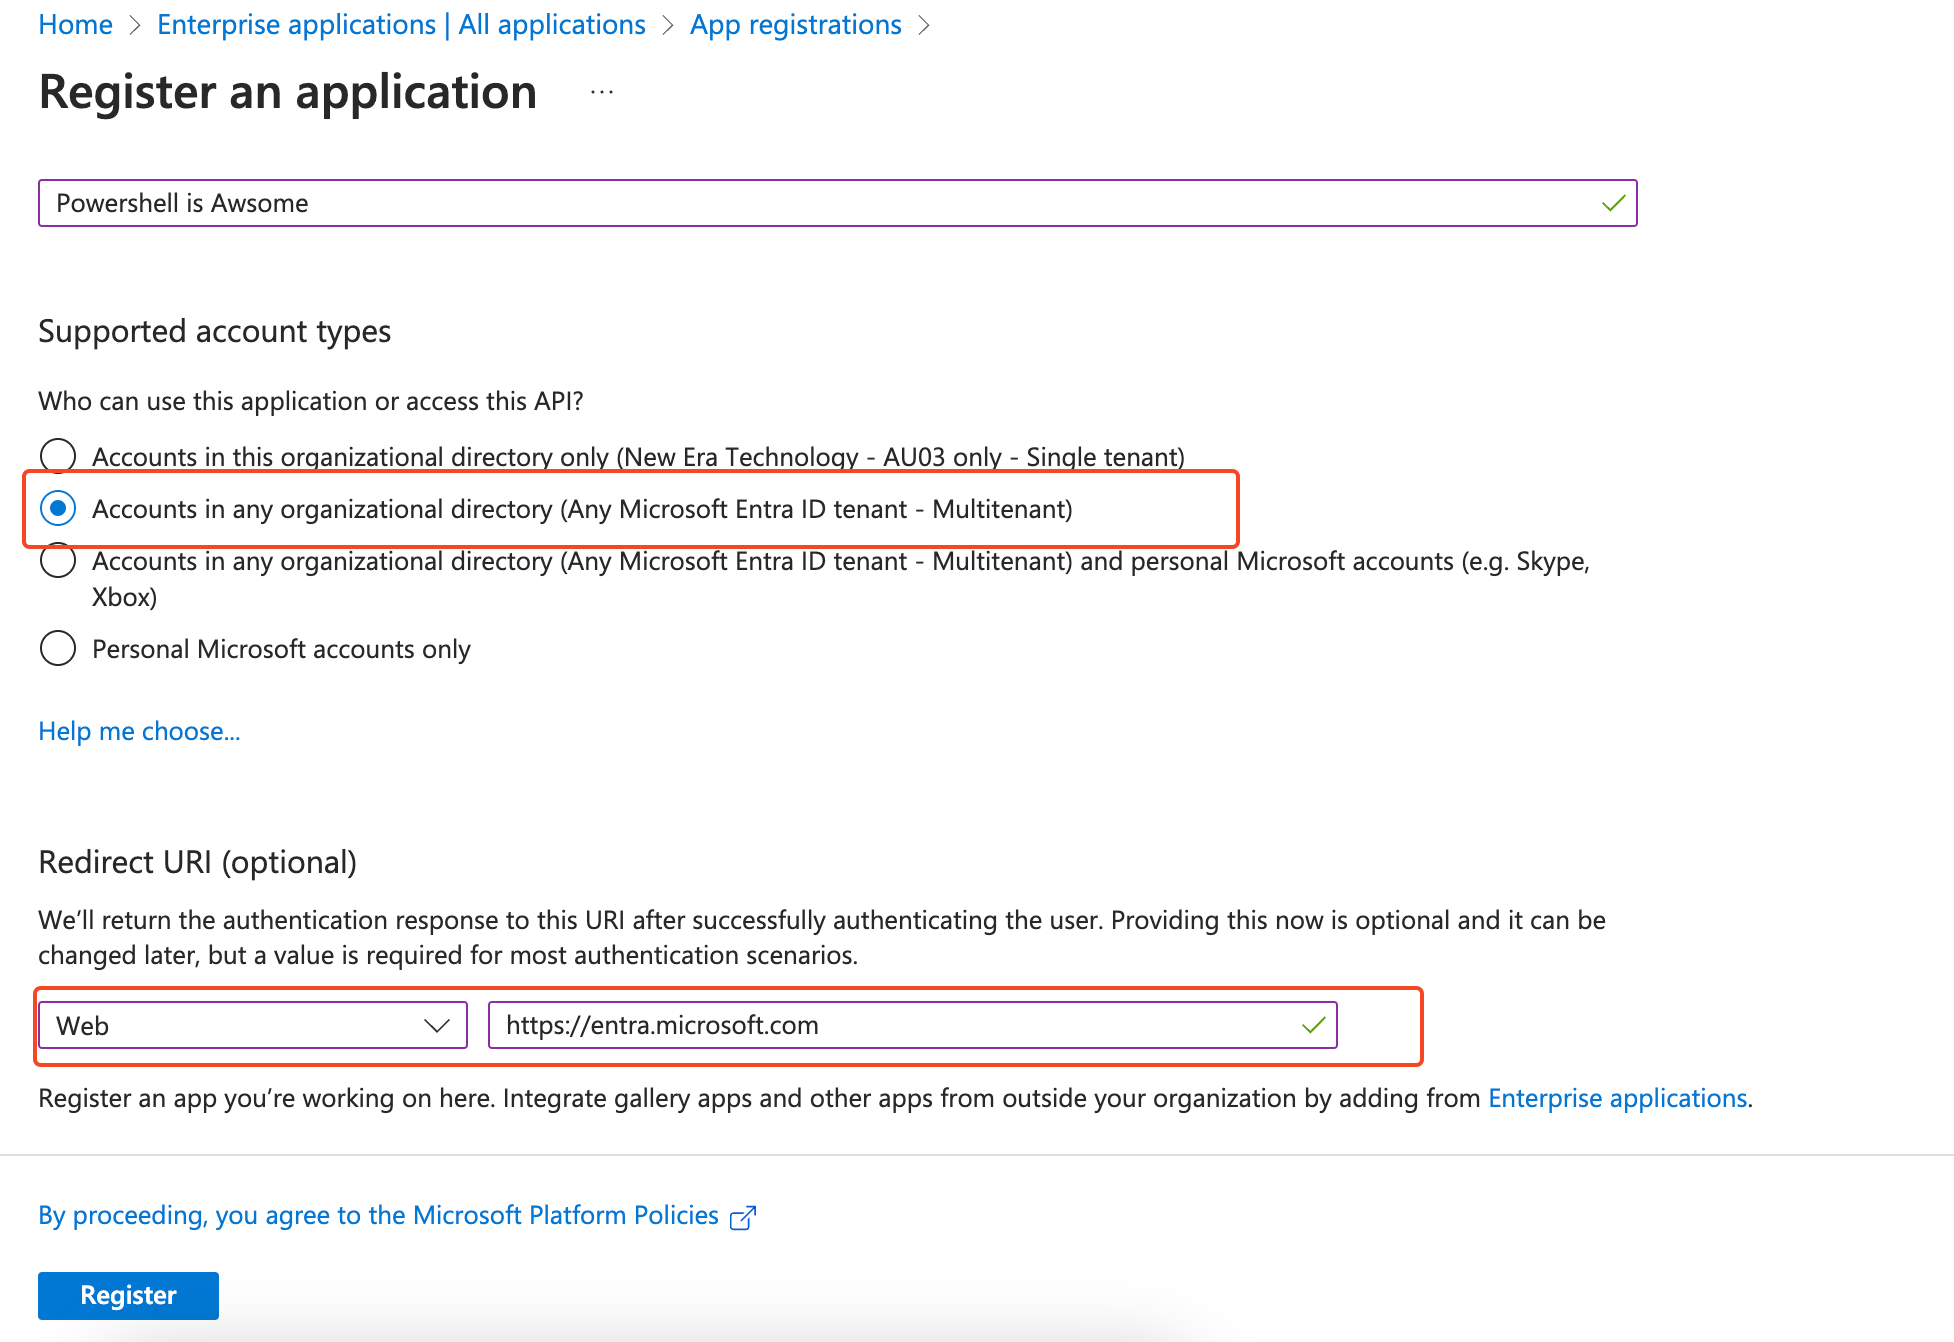
Create a new App Registration, give it a meaningful name. Now the important step; under Support account types select, Accounts in any organizational directory. This is what makes the app multitenant.
For the redirect URL, you can make this whatever you wish, this is the URL the page will redirect to when you consent to the app.
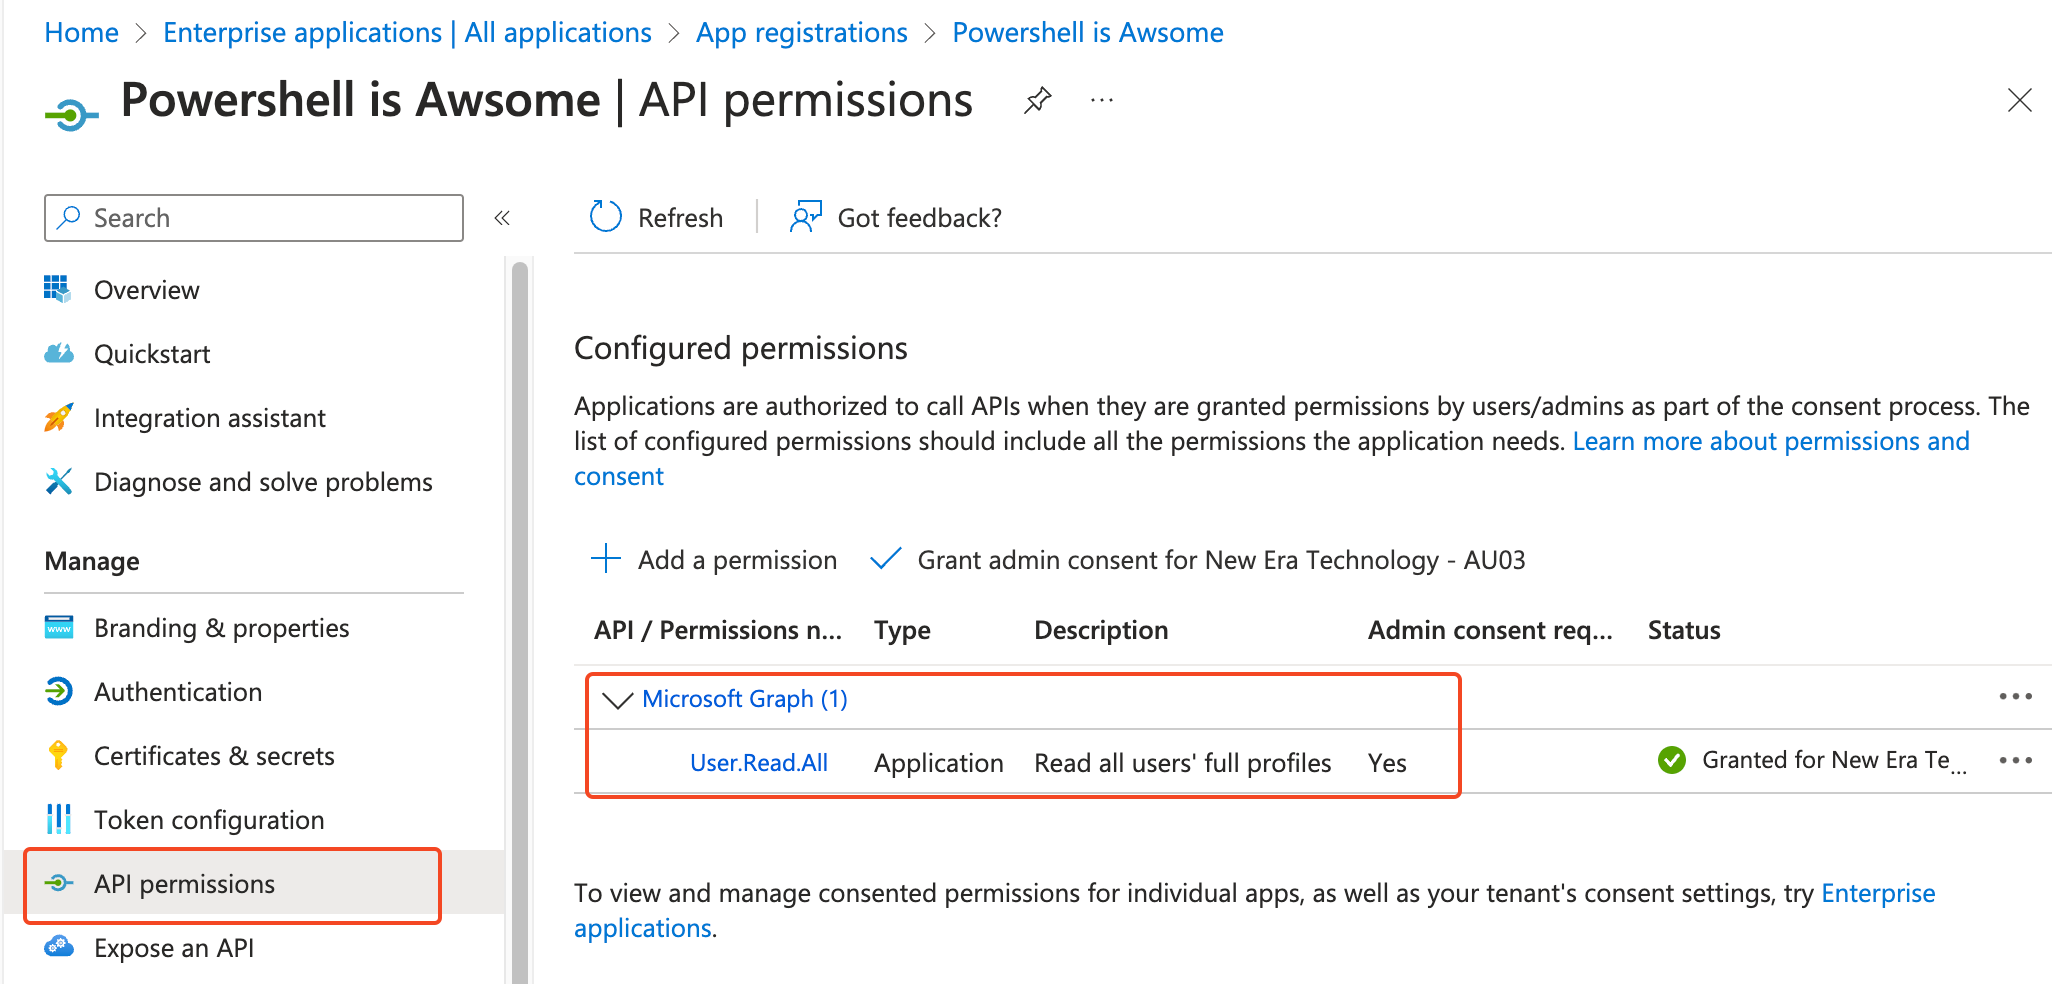
Once the app is created, we then need to add the APIs we need for our automation to work. Select your app, under manage go to API Permissions. Here we will add the needed Microsoft Graph permissions. For this demonstration I will select User.Read.All.
NOTE: For MS Graph you can select either Delegated Permissions or Application Permissions. For this we want to use Application Permissions. Delegated Permissions is for when we need to impersonate a specific user and access resources on behalf of them.
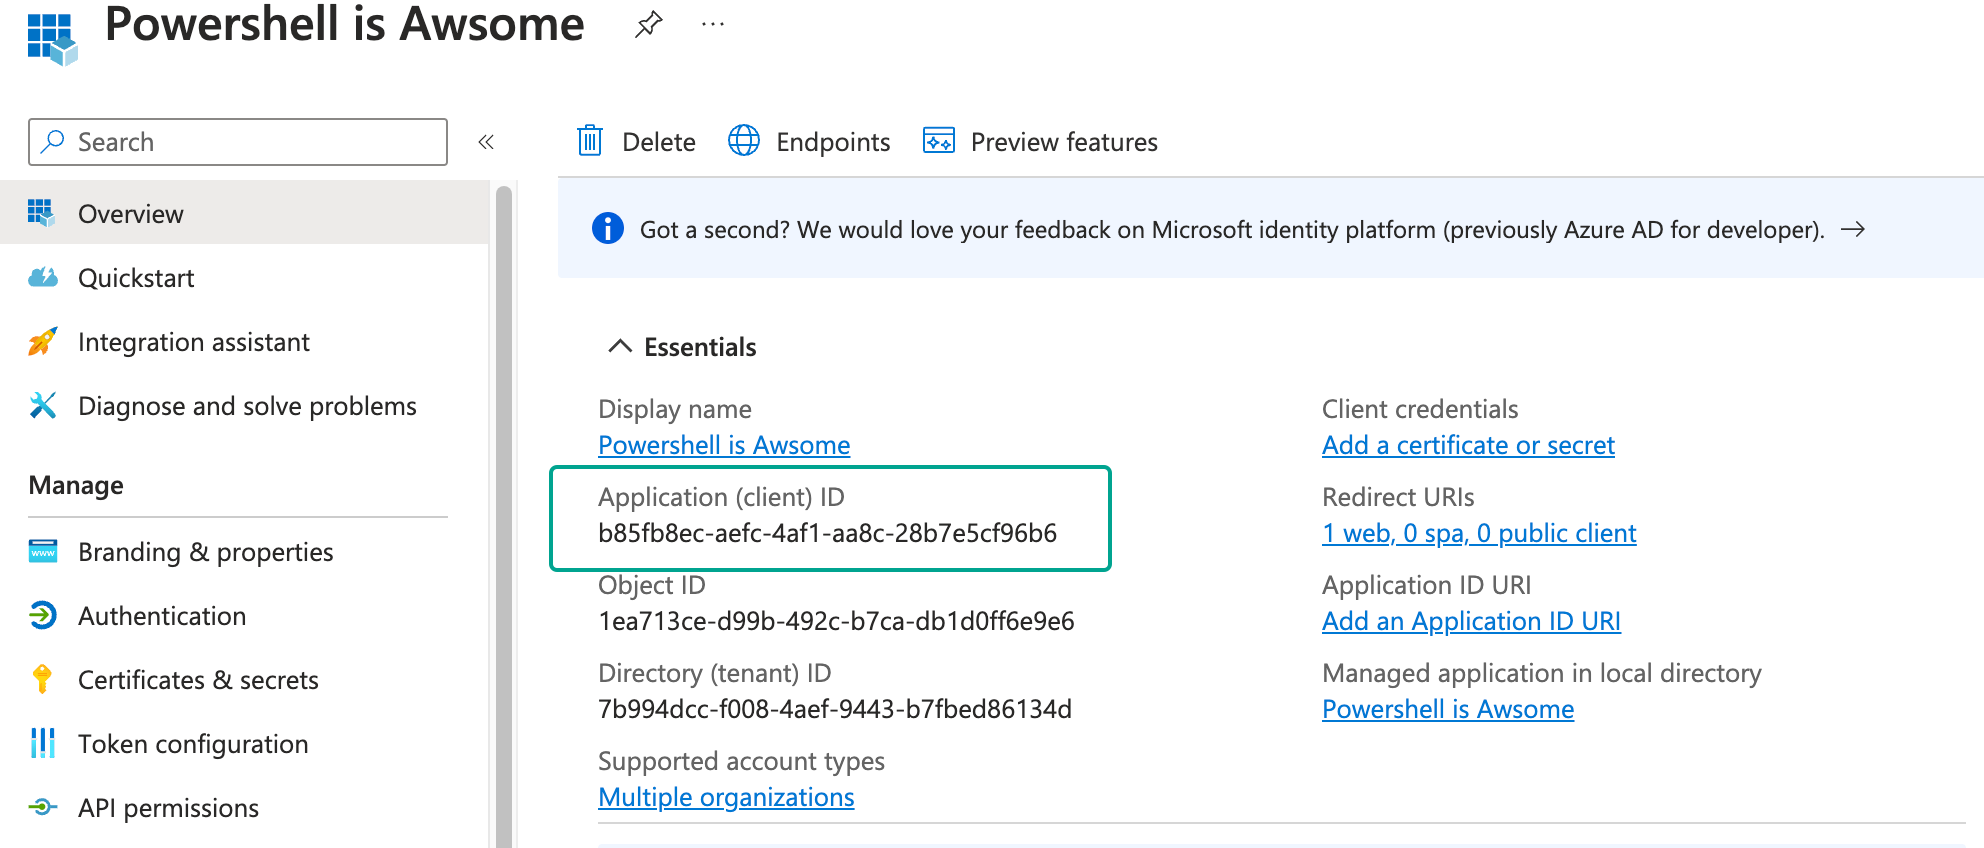
Now that we have created our application and added the needed permissions. We now need to consent to the application for all tenants we wish to run our automation on. To do this we need to grab the apps ID (Client ID).
Click on overview, and you will see your client ID.
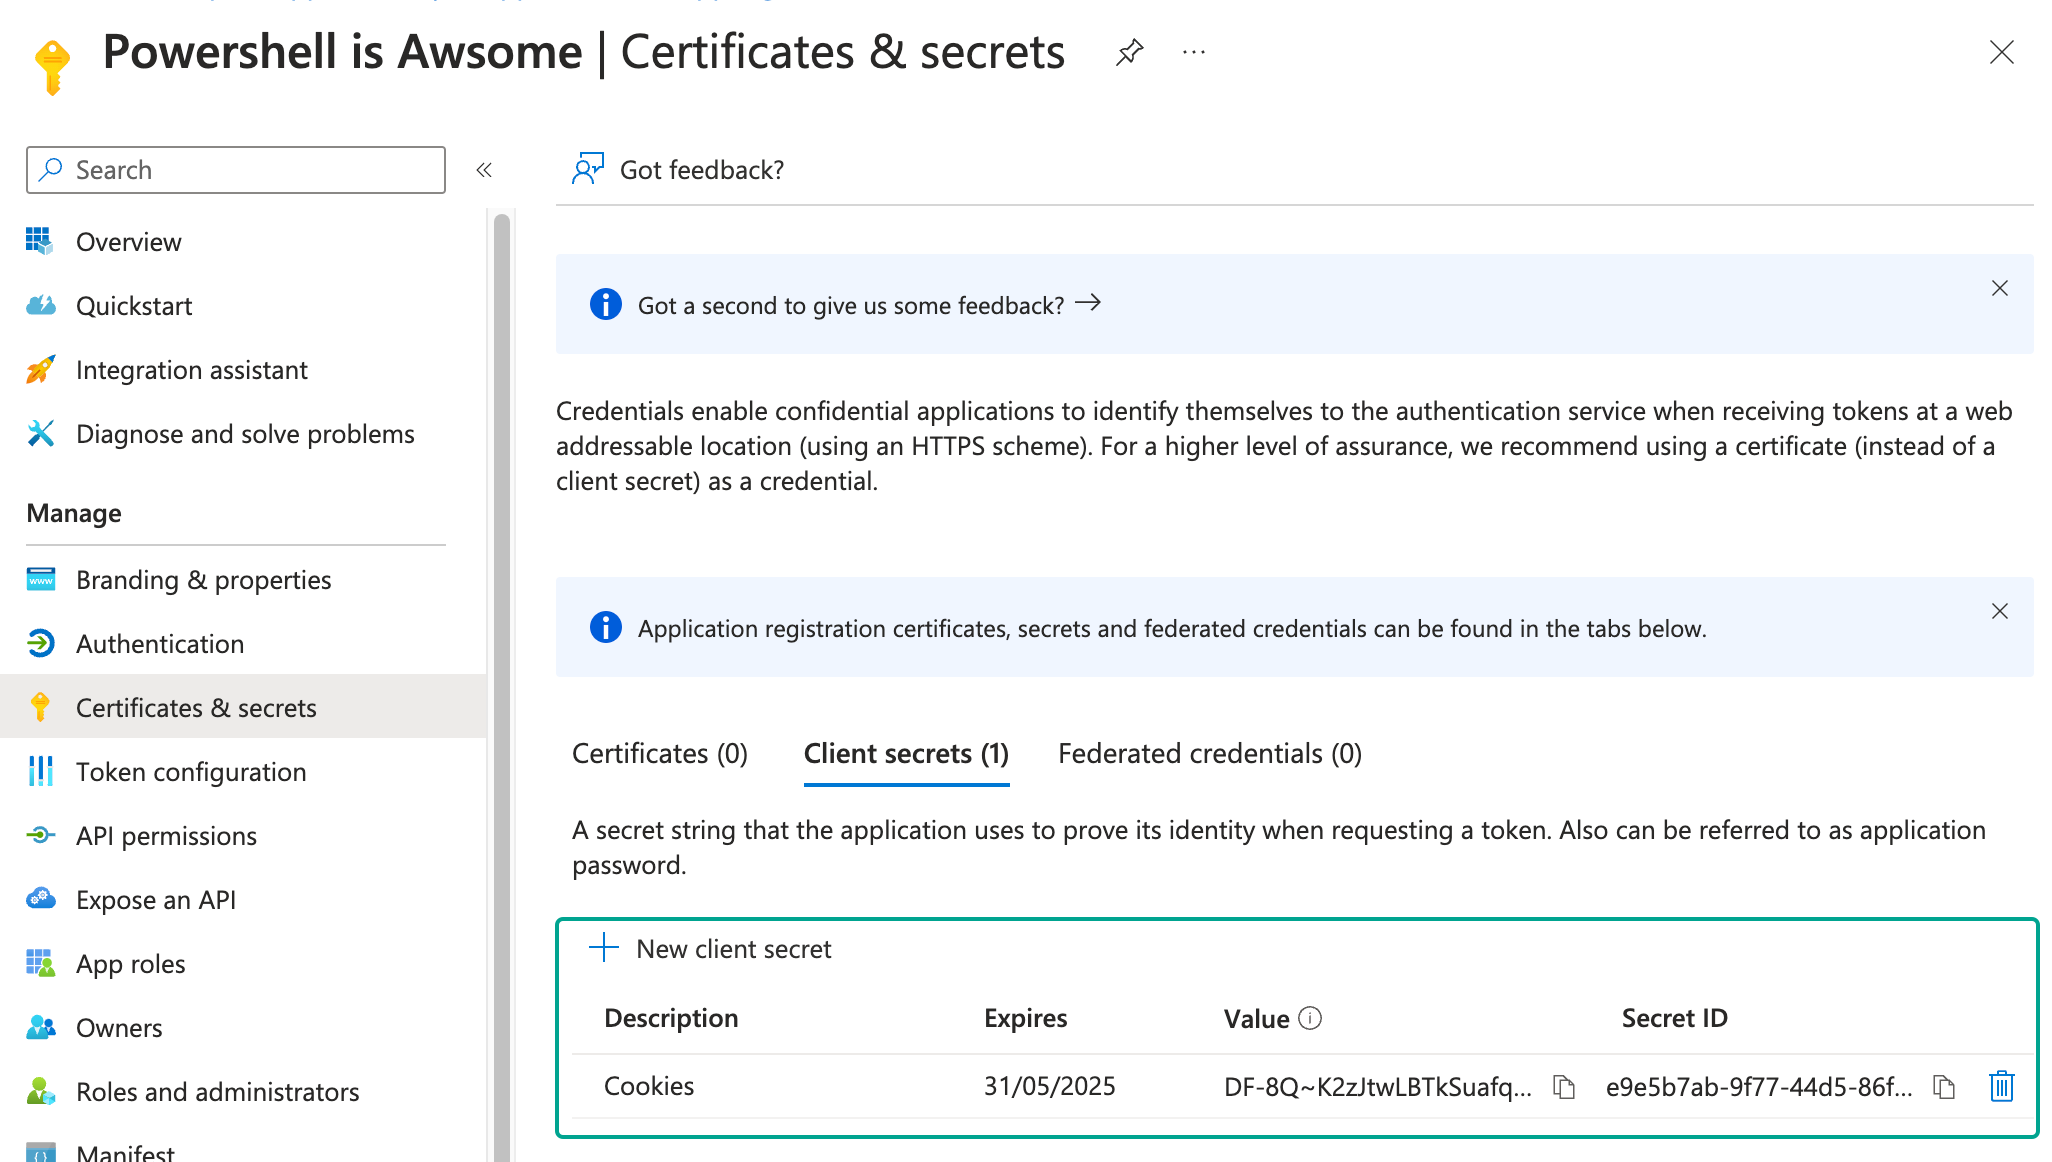
OPTIONAL: This step is optional, but we will create a client secret. This will alow us when using the microsoft graph to connect to the app without needing to sign in each time.
Go to “Certificate & secrets”. Add a new secret and save the value for later. Our example script will use this value.
Step 2: Consent to the Application
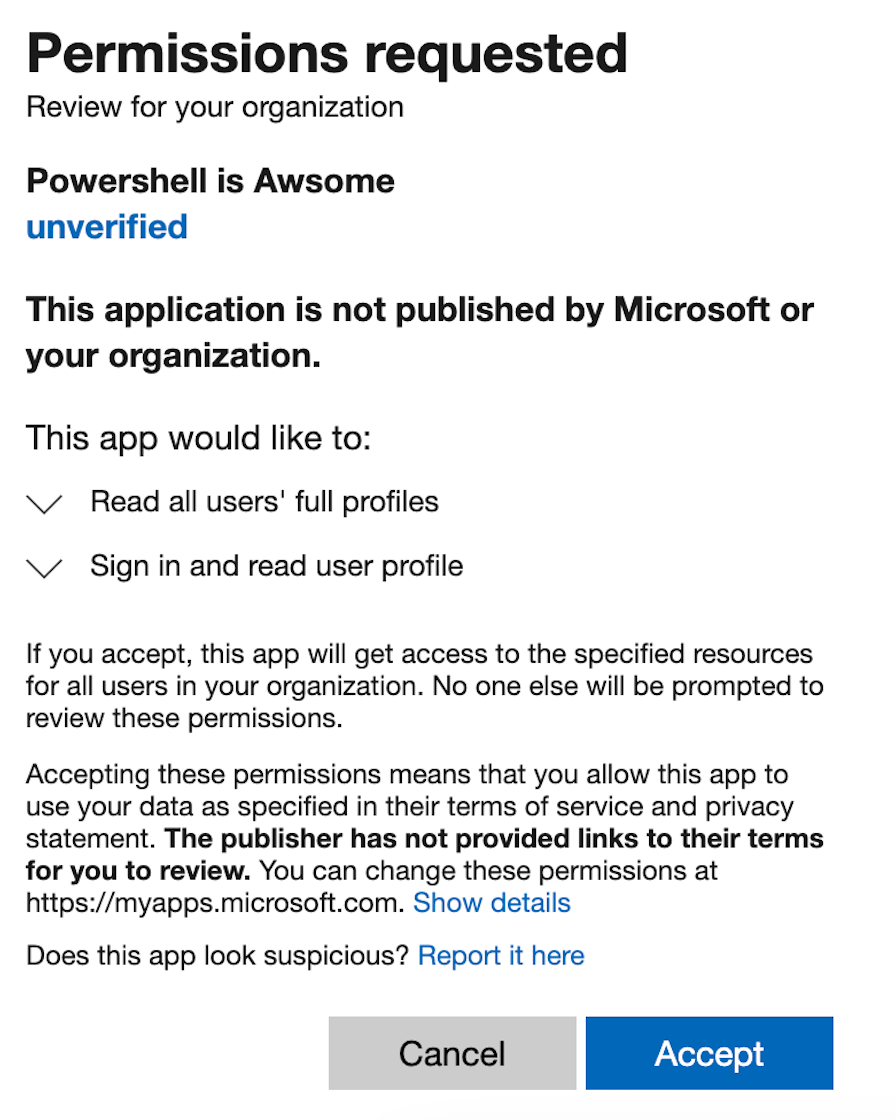
Before we can use the application to run our automations we first need to consent to our application on each tenant.
To do this we will go to the below url, replace {CLIENT ID} with your apps ID you copied in the above steps.
https://login.microsoftonline.com/organizations/v2.0/adminconsent?client_id={CLIENT ID}&scope=https://graph.microsoft.com/.default
The scope value: https://graph.microsoft.com/.default tells microsoft to use the API permissions we defined on the application in step 1
When you go to the URL you should see the below screen
The final bit of information we need, is the tenant ID for each tenant. You can get this information from the Entra Portal.
Complete this step for each tenant.
Step 3: Powershell time!
We now have all the bits to the puzzle. We have a multitenant app with the needed API permissions for our automation and we have consented to the application for each tenant we want to run the automation against.
Now is the easy part. The Microsoft Graph Powershell module has all the functionality we need build in. It is as easy as this:
1
Connect-MgGraph -ClientId <App ID> -TenantId <desired tenant ID>
As mentioned in Step 1, to make it more automated and to support unattended sign in, we will use a client secret to connect. Below is how to do this in Powershell.
1
2
3
4
5
6
7
$ClientSecret = <Client Secrete we created in Step 1>
$ClientID = <App ID>

$ClientSecretPass = ConvertTo-SecureString -String $ClientSecret -AsPlainText -Force
$ClientSecretCredential = New-Object -TypeName System.Management.Automation.PSCredential -ArgumentList $ClientId, $ClientSecretPass

Connect-MgGraph -TenantId $tenantId -ClientSecretCredential $ClientSecretCredential -NoWelcome
Conclusion
That’s it! It’s really that easy. I’ve seen lots of people register an app in each tenant and use the same certificate or secret to connect and run automations across multiple tenants without needing to sign in. Without knowing that there is a much easier method baked right in. I hope this helps my fellow sys admins and IT teams out there.
As mentioned in the intro, at scale, you can use the Partner Portal API to bulk consent on behalf of your customers if they are all enrolled in your partner portal. Let me know if you want a guide on this, and I will write one up.
